Wednesday, 20 March 2013

Wednesday 20th


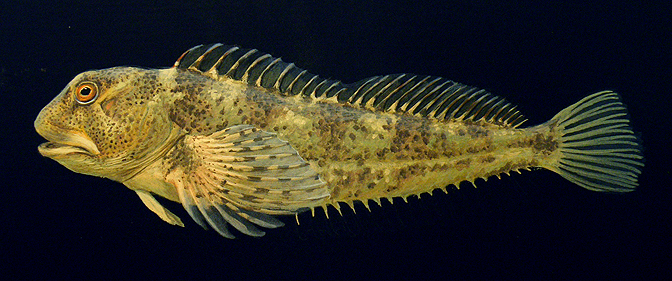
I took the shanny painting over to the off-show fish rooms where I had arranged to meet Sam from the Aquarium. He looked over the shanny illustration, and gave it the 'OK'. I had explained my worries on using less than helpful references and having to piece together bits of scant details and guess the whole, but he was happy with the results. So I took it back to the studio where I scanned it in and did the usual colour adjustments to the black background. Then placed the finished image into the right folder on the computer and then dropped a copy of the image into the ID document. This is the same one that has the flounder on, so now, with the shanny image placed, the sign was complete and ready to print. 

After printing, I trimmed it to size and laminated it, then put double-sided tape to the back and got the sign up on the wall by the tank in Seal and Penguin Coasts just before lunch.

After lunch I went out sketching; my fortnightly 'self-training' session. The weather was cold and overcast so I wrapped up warm again and headed out to find something to inspire me. Because it was cold many of the animals were tucked up in their indoor areas, some of which don't have a convenient area where I could tuck myself out of the way of the public. When I'm at work and out sketching I am very aware that sitting for a period of time in front of an enclosure is an 'obstruction' to the view for our visitors, so I try to sit/position myself somewhere less obstructive. I wandered round the gorilla moat but the gorilla were sensibly inside at that time, so I went on round to the top terrace and looked at the red pandas, sat at the top of their tree again, lucked out on the lion cubs... they were out, but tucked in the vegetation at the back of their enclosure. So on round to the flamingo paddock where I got inspired to sketch the red-breasted goose.. but sadly sitting on my little tripod stool (I forgot my foldaway campers chair) the handrail was perfectly at my eye line.. I had to either duck to see through the glass beneath it or stretch my neck to peer over the top. The goose looked great through the binoculars, but I just couldn't get in a position to comfortably sketch for a while. So I picked up my stool and sketch bag and headed back to the gorilla moat. I settled down on one of the benches tucked in a little bay just off from the pathway Through my binoculars I saw a lovely duck, a hybrid. It looked like it was a mix of pintail, shelduck and maybe mallard. I sat and sketch this duck for about an hour. I just watched it for a long time first, to get a feel subconsciously of it and see what positions it favoured. It was spending its time between little naps and preening.


I started to get cold, so I wandered on and found my friend and colleague, Anna, out and about putting up the signs she designed for the dinosaurs.


This is her putting in the screws to attach the ID sign for T Rex onto a pole. You can see the scale of T Rex behind her. After a quick chat to see how she was getting on... I moved onto to find a warm animal house to sketch in. 


I had the Forest of Bird house in mind, but when I got there it had about 4 gardeners working in it. I looked around and the birds were all up high in the trees at the top of the roof... they were staying out of the gardeners way, so sketching opportunities would be scant, if any. So my next choice was the meerkat house where I tucked myself in the corner and though the afternoon was wearing on and visitor numbers were now thinning out, there was a steady stream coming through. But it was a lovely hour watching the meerkat's behaviour and listening to their constant chatter. 


The house was closed just after 4.30pm, by Jo who works on that section. I headed back to the studio to have a warm drink in the 45 mins before the end of the day. I checked my emails and had a request form sent through from the mammal section for the European souslik, a type of ground squirrel. These are replacing the black-tailed prairie dogs that have been at he zoo ever since I have been there. I don't know why the prairie dogs have gone but the souslik are due to arrive at the beginning of April. So I got straight onto an internet search for souslik images before it was time to go home. They look like cute little critters.


Tuesday, 19 March 2013

More shanny-gins


Today I spent the whole day painting the shanny, following on from yesterday's progress. I have added some detailing to the head, working on the eye and mouth in particular.


Then onto the body and working on the motley patterning I roughly mark in the darker patches along the body. In my reference photo's I haven't got a good continuous photo of the body length showing the markings... so I have studied several photo's from various fish with slightly different patterns of dots and splodges. Seems they are variable so, hopefully, I got the gist of what the pattern is generally and have can reproduce something that is shanny-like. 


I continue the darker spots and splodges to the caudal fin (tail) and down below the lateral line on the side of the body. I am putting in a few markings on the area where the pectoral fin will be, but not too many as most of this will be painted over opaquely so no point adding detailing there. I also add in some intermediary colour to the body between the main patches of spots, this is a darker green grey mix. It's  a soft colour that just ties things together and I also add a few splodges of much lighter beige to the top of the body in the lighter areas of body markings.


Now I add the rays of the pectoral fin.


 Then add on the darker spots and paint in the translucent skin of the fin using a very thin wash of pale blue and also one of a warm yellow. I add a few highlights to the rays and work the spotting in.


Close up of the finished pectoral fin. You will notice that my detailing is not particularly fine in that I haven't tried to paint in the spot shapes perfectly. This illustration is much bigger than the image on the sign will be seen at, so in the process of reduction these 'rough edges' will disappear to the human eye, being too small to see well, but still giving  the image its detailed look.


Onto the dorsal fin which though essentially looks like two fins is actually a continuous right along the top of the body. I paint the rays in... the first set of rays are like spines and the ones in the second part of the fin are softer. I take the patterns of dark and light again from an amalgamation of several images, seeing what the general patterning is and trying to paint something similar.


Then once the spines are in I add the translucent skin between again using two washes one of a soft blue and one of a warm yellow.


 I add some highlights and make the tops of the rays and skin between lighter. and then paint in the caudal fin laying down a thin wash of blue and then painting the rays on top with the neutral colour mix I have used throughout this illustration. I also put of wash of pale white-ish blue along the top of the head down the nose and along the body in front of the dorsal fin... this helps 'round' the body, adding to the sense of form as light catches the top of the fish.


Dark patterning is added to the tail, taking the same approach with the reference material as I have done with most of this fish.... studying all the photo's and working out a general theme of pattern, colour and hoping my experience can pull it together. 


Next.. the fin that runs along the underside of the body... this is the hardest fin to do as most of the photo's I have do not show this fin... I have a few photo's showing a small part of it, or showing the whole length but the fin is not splayed, and just one or two that show the fin but have completely different light on it and different colours... one has no pattern and the other a hint. So again it's a case of taking a best guess at what it is from the reference I have available. When I take this to Jonny to be checked I can discuss these issues with him and correct it if necessary .


Once the fin is done the fish is finished at this point and now ready to be checked by the animal department... I hope to be able to take this to Jonny tomorrow for his expert eye to be cast across it.


Monday, 18 March 2013

Shanny-gins


Today I started on the shanny blenny - Lipophrys pholis. I had painted the black background last week,  sized my drawing slightly smaller to fit on the paper better and traced it ready to start this week.
After transferring that tracing to the black background I then painted in a base coat of a neutral greyish brown... it is a colour in my palette that I have no idea what colours have gone in over the months even years to make it. 


That's what I like about gouache, it is very economical in that you can mix a batch of colour and if you don't use it all, you just leave it in the pallette - it dries out and stays like that until water is added again... this can be months or even years later and if the colour isn't quite what is needed, more colour(s) can be added. So I have a batch of pallettes that I very rarely clean... I have colours there which I use time and time again, added to with other colours to adapt to whatever illustration I have going, or left because, as with this particular neutral greyish brown, it is perfect as it is for a specific job like a base coat. I have a pallette for brown tones, one for greens and several wih a variety of neutral tones and other colours.  I do, of course have one or two pallettes that are kept clean for things like white mixes. 

Onto my base colour, when it is thoroughly dry (I often wander off to check my emails or do a little job that doesn't take very long - like today I swept around the studio and took the rubbish out) I used a dry brush method to add a layer of a greenish yellow grey... still fairly neutral but just a touch more colour than the base coat. I do this all over the head and body of the shanny. I do this to start creating the motley pattern that this fish skin has (shanny do not have scales but a smooth looking skin). It also adds texture allowing further coats of colour, when added, to continue with the motley look.


Next I start laying a few washes over the body to start to add a little form, putting in the lateral line, gill covers a shading to the underside of the body and along the lateral line and around the head. I also put in some rough colour for the eye, using a muted orange.


I add some definition to the eye and form of the head


In this close up of the head, at this stage in the painting you can see some of the washes applied to the head.


Now I work back along the body roughing in the darker patches on the shanny's markings using a warm pale brown. this is deliberately done with a on precise brush stroke to add to the motley effect.


 I now paint a greeny grey onto and between the brownish patches tosoften the effect and tie them together.


Back to the head and now I start applying random dots in a slightly darker brown to start work on the motley markings.


Along with this progress on the shanny I did a few of the odd little jobs that I tend to forget or put aside... among those were sweeping the studio and taking out the rubbish, emptying the 'paper to be recycled' box and taking the full bag out to the bins to be collected. Ordering more green bags for the 'paper to be recycled' box and also ordering 10 sheets of watercolour paper from the local office/art stationery supplier we use. I am now using the last sheet of a large pack of 56x76cm approx 300grm Sanders watercolour paper that I think I have gradually got through over the last 17 years. (I am sure it was here when I started this job!) This paper is generally used only for the fish illustrations and I cut  a piece smaller than A4 for each fish, so no wonder it has last so long. 

At 5pm I was feeling i the need of a naughty treat so I did a Choccie Run' to the vending machines out in the zoo. Unfortunately the one nearest the building I work in wanted only the correct change and I wanted one that would give me change so my Choccie Run' was a little further than anticipated but it was worth it as on the walk back to the studio I noticed the lovely love warm cast of light from the sinking sun catching the tree tops in the grounds against the beautiful blue sky that we have had today. And in each tree that I passed there was a bird or two sat, either singing its heart out or settled down quietly on a branch or twig. The lack of leaves and lovely light allowed me to easily see the birds - two robins competing with songs for territory claims in different trees, blackbirds -  male and female, great tit also proclaiming its right to something very loudly, a jackdaw added its two penny worth, two collared doves snuggled up quietly, a blue tit searching through bits of lichen and  a wood pigeon also hunkered down quietly. The air was full of bird song- twitterings, trills, cheeps, caws... all sorts of song bound together with the low sunlight and blue sky to give me that definitive 'Spring is here' feeling. What a way to end the day!


Thursday, 14 March 2013

11th - 14th

Mon 11th

This morning I went across to collect my new zoo trousers that I had ordered last week from Roger, who works as part of the Front Of House team, and then picked up the mail from the Central Office on the way back. On my little excursion I noticed that the dinosaurs have returned! Several dinos were sitting near to where they were to be positioned, some were partially unwrapped, so they have only arrived in the last day or so I should think. 


I also noticed that there were some bird ID's missing off one of the aviaries, luckily there was a keeper on hand who explained that a few birds had been moved around. So back in the studio I printed off two new ID signs for the white winged wood duck - Cairina scutulata, trimmed, laminated and trimmed them again to size before heading back out to put them up on the aviary in question. Whilst I was out I headed round to the Flamingo Paddock to check on the male ruff (still no change although his feather colouration around the neck is changing slightly). On coming out of the paddock I noticed that the two Asiatic lion cubs, Ketan and Kamran were out enjoying some playtime in the sun. I had brought my camera to take a few pics of the dinosaurs and whatever else might be interesting too.


The two boys were quite boisterous and the bigger of the two, Ketan, was busy 'hunting' the couple of small children who were watching them with great delight. Apparently this his favourite game at the moment. They are about 4 months old now and are looking like a pair of happy playful, mischievous cubs.

Whilst I was out with the camera I wandered on round to Bug World to check again on the mural for water damage just in case any wood had taken its time to show signs of water invasion. Luckily all still seems to be ok. But whilst I was there I saw that in one of the tanks a number of the invertebrates were out in better view so I took photo's of bristleworms, brittlestars and the hermit crab.

Walking through Bug World I took a quick look at all the exhibits a) to make sure nothing new was on display that I needed to know about and b) just because I like looking at all the animals. I found a new one..... a huntsman spider who was donated to the zoo after being discovered in luggage by some people after returning from their travels. Glad I didn't find this beastie... although harmless it sure looks like the proverbial 'scary spider' of my nightmares. Still... I do find them fascinating to look at and them being enclosed safely out of reach, behind glass, makes that easier! 


Huntsman spider


When I came out of Bug World I passed another of the dinosaurs, one with feathers this time and at its feet a male blackbird was foraging in the newly positioned soil for any tasty morsels disturbed by the gardener's work. I couldn't resist the picture of a bird at the huge feet of one of its ancestors.


Back to the studio to sort out the photos and start work on the next illustration... the flounder. I mixed up some more black (I always make my own mix of Lamp black, Ultramarine and Alizarin crimson) and after damping a piece of Saunders watercolour paper (300grms) I applied the colour to it. Onto this I then traced the outline of the flounder and applied a base coat of a neutral light colour. It's hard to describe what colour it is being neither grey, beige, fawn or pale green... but a mix of all three.


Tuesday 12th

Most of today was spent painting the flounder. I had a break later in the day to go over to the Feed the Lorikeet aviary to remove the white winged wood duck ID's (they had been moved to another aviary - which I did the signs for yesterday,) I could not use the same signs as they are presented in different ways. The Feed the Lorikeet aviary was closed to the public but staff were working in there trying to clear out the volumous build up of sludge in the aviaries pond. The water pump had failed (hence the moving of the ducks out to another aviary) and whilst the ducks were out and the pond very low in water level the decision was made to clear the sludge. Not a nice job, especially on such a bitter cold day! They were having problems pumping the gunk out as the pipes kept getting blocked with all the stones, twigs and other debris in the sludge. I removed my signs and left them to it.


The flounder was tricky to do, due to my unhelpful reference pictures, but I was able to glean enough from them and my own observations of the fish to finish the illustration. I finished late in the day again and it was too late to get it checked by the animal section so that'll wait until tomorrow.


Flounder


Wednesday 13th

Contacted Jonny from the Aquarium not long after I got in and arranged to go over to get the painting checked. Jonny was happy with the illustration so I was able to go back and start the process of colour correcting the black background to 'pure' black on the computer. After scanning the image in I drew around the outside of the fish with a red pencil tool on the computer... this took some time as I had a lot of spines to go between carefully and I was able to 'tidy' them up a bit too..... such small fiddly details my eyes find hard to do on the painting these days. So it's handy that we use digital images for our signage, I can do such corrections a whole lot easier!

Once I had drawn completely around the fish I then converted all the back background to red before then selecting it all and converting it to the 'pure' black.  It's easier to use another colour first as I can see much more easily where I have been... drawing black onto black (even if the blacks are of different values) has a tendency to strain the eyes.

Once that was done it was placed in a folder on the computer and the image added to the ID sign for the flounder. It won't be printed out yet as there is another species on the same ID, still to be done... my next project..... the Shanny - Lipophrys pholis.

So to prepare for my next illustration of shanny, I check the ref pictures I had gathered for it so far... again same problem as I have had with the seahorse and flounder recently... dark tanks, secretive fish... not great photos!

So I do an internet image search... very frustratingly so many images... but just of the head. I had shots of the head I needed tail, body , dorsal fin and the finage on the ventral (underneath) side of the body. In the end I found a few pictures of the bits I needed reference for but it took me a very long time searching, putting in different names... the common names (it has several) and the scientific name. With each name I get mostly the same images but one or two different ones. In the end I printed 4 A4 sheets... each holding about 7 - 9 pictures.

Using these I was able to get a drawing together for the fish. getting the ref for the underside of the fish was the trickiest as I found just three images of a shanny NOT lying on a rock and therefore showing the fins underneath and only one of these showed the fins splayed so that I could count the rays to get that right. Hard work!


I went back down to the Seal and Penguin Coasts exhibit to try and get some more photo's of the actual fish and although I saw two... they were both in very dark areas and one was only showing his head. SO not much help! However... the one that was just showing its head was a male as he was very dark, almost black in colouration and his upper lip was white-ish. I took a photo using a tripod...


When I got back to the studio, looked at the image on screen and brought up the light levels I noticed the pale dots on the surface of his hiding place behind him. Back on the internet to check some info.. were these eggs? I checked several sites and yes the male guards the eggs and the eggs are stuck to a surface such as rocks in a crevice. I contacted Jonny in the Aquarium via email with the pic attached... as its such a dark area I didn't know whether he knew they were there. He replied that they weren't there earlier that morning when he checked the tank, so he went back to retrieve them to rear them on in safety, as the male sometimes eats the eggs. 


Thursday 14th

If you are a regular reader you will know that I don't usually work Thursdays... I had some hours to make up for a day I took off recently and the All Staff Meetings had been arranged, unusually, on Thursday and Friday this time... they are usually split up to cover the first and latter parts of the week. So I chose to work this morning so that I could attend the meeting and make up some time too. I particularly wanted to be at the meeting as one of my colleagues at the zoo - Ginny, a good work friend, was celebrating her 30th year working at the zoo! The Director, Bryan, and her Line Manager, Nick, both said some words to thank Ginny for all her years of service which was lovely and she got a warm round of applause from the staff.

After the meeting, when I was back in the studio I got a call from Ginny to say there was cake to be had, but I had better be quick as it was going rapidly! So I hot-footed it across to the finance office, where Ginny works, to get some cake for a few of us who work in the Education Centre. It was delicious too!

I prepared the background for the shanny with a black coat of gouache and let that dry, I prefer to wait until the paint is several hours dry before trying to trace onto it or paint a base coat. So whilst that dried I went on the computer and started doing checks on the references I have for the next four species on my to do list. These are the Roti Island snake neck turtle, Timor Island zebra finch, great plated lizard and blue spiny lizard. All of which had photos to crop, change light and colour levels on and sort out good photos from bad. This took me to lunchtime when it was time to go home, as I was only doing a half day today.

I finish with a couple more photo's that I took at the zoo this week.


 African penguin catching the fish thrown in during a feed.


And two of our female Western lowland gorillas. The older gorilla was enjoying a carrot whilst the younger female looked on enviously.


Thursday, 7 March 2013

4th - 6th March

Monday 4th

After returning the dust sheet and paints to maintenance from the last couple of week's mural painting I popped across the zoo to the Flamingo Paddock to check on the male ruff's plumage. I have to change the ID sign over when they go into breeding plumage as they look so different. I'm keeping a weekly eye on this, as last year the males started growing their ruff feathers earlier than the previous year. As the birds are maturing (we had them when they were quite young adult birds) it seems they are coming into breeding condition earlier. I guess this will level out once they reach a certain age. Last year it was the end of April, so I'm trying to be prepared just in case they change even earlier than last year.

Now that all is done on the giant squid mural I can get back to the illustration I started before Christmas; which is of a short-snouted seahorse Hippocampus hippocampus. I had got the black background and a base coat of one colour on the seahorse body, so now it was time to finish it. The reference I have is very unsatisfactory in that I had little luck getting images off the internet for that specific species in the colour mode ours are in and with all the details I need for head, tail, fins body markings etc. The photo's I had taken of the animals at the zoo were poor due to the very low light levels of the tank they are kept in and observing them for such details isn't helped by the low light and the fact that they like to hide and curl up. So I struggled a bit getting the colours etc I wanted.

Tuesday 5th

What a beautiful day! The sun graced us with its presence all day and it was quite warm. As I walked in this morning and passed the meerkat enclosure they were all out standing on various bits in their outside area to get the full benefit of the sun's warming rays.


They are just so cute..... had to take a few piccies of them!


First mission of the day was to go and have another look at the seahorses.... so camera in hand I went to the Seal and Penguin Coasts exhibit, where the seahorses are kept in a tank in the underground area. On my way I had to take this piccie of a wood pigeon... just made me smile that it was sat on the huge stag beetle sculpture....


I attempted to get more reference pictures of the seahorse and to have another look at them again... but once again they were mostly hidden and curled up, so no chance of getting any better images or observations. So back to the painting and taking educated guesses on a lot of it. I persevered through the day and by just before 5pm I got it done and headed over to the off show fish rooms to get it checked by Grier, a keeper on the Ectotherm Section (cold-blooded animal). It passed muster with no changes to be made. Phew!


I had a little break during the day, as I was struggling with the seahorse and needed to rest my eyes from it for a while; so I helped Anna, my colleague the graphic designer. She has to change the font and the overall size of the ID signs for Bug World. Our Line Manager has selected a number of fonts and put them to a collective vote by the Education staff to see what works best for readability. As there are a number of ID documents still in the old design application software of Quark and Freehand (I am in the long process of converting them all) I sat at the computer for an hour or so converting 7 invertebrate ID documents to Illustrator (design software application). This also involved me nipping over to Bug World to check what animals were currently on show, so that Anna need only update those to the new format.

On my way back from getting the seahorse checked at the end of the day I walked back round the zoo the long way, as it was still beautifully sunny and the light was lovely and low. It sometimes enables you to see and notice things you may pass every day for the last 17 years in a different way. This was the case as I passed the rockery garden area.. the light shining through an evergreen's thick foliage caught the bark of the trunk... just enough for me to think.. 'that looks different'. I bent to look up under the foliage and saw a beautifully lit array of trunk and branches, with warm reddish colours and purple blue shadows. I was so taken with it ... yes I took a photo!


Last job of the day was to scan in and colour correct the image of the seahorse ready to be put on its ID document tomorrow.


Wednesday 6th

This morning was supposed to be my sketching morning but it was drizzly and cold and grey, quite a dramatic change from yesterday's lovely sunshine. So I put my sketching off until the afternoon. Instead I  was back on the computer to put the image of the seahorse on its sign and add the text and pic of a greater pipefish too, as there was also at least one in the same tank. Once that was printed, trimmed to size, laminated and trimmed to size again I could put it up on section. I also had to put up two blank ID's on a bird aviary after noticing, on my walk back to the studio yesterday evening, that the red-crested turaco ID had been removed from one holder and turned round on another. So the latter was done first and then I headed back to the Seal and Penguins Coasts underground area. As I passed the first tank, which holds flounder and shanny I saw that the flounder were clearly visible... probably the first time I have seen them so well... and I didn't have the camera with me! This was the next species to do on my list... so I rushed back to the studio to grab a camera and then back to take several pics of the flounder fish and one of the shanny's was out of hiding too so I grabbed a few of him as he's next after the flounder to be painted.

The pictures were the best I have got yet, but still not brilliant and even worse than the ones I had for the seahorse!! Hey ho.... will see how I get on with them.

We had a phone call from Benn (Estates) to say that one of the new tanks (in the set up process) in the new area just built in Bug World had burst and flooded. There is a safety flood barrier set up but unfortunately the water ran out of a broken seal on the tank, down the wall behind the mural and to the floor where there was a little gap between the wall and the flood defense... and of course it went down that gap! there was some leakage into the restaurant below but I don't think it was serious. I was sent up to check the artwork of the mural to see if it had any water damage. From what I could see in the low light level of the room the mural had survived unscathed. Luckily there were no corals or other animals in the tanks that were affected... two tanks ran on one system, so both emptied. But the poor staff in Bug World have a lot of extra work to do to repair the tank and reset the system.

Just before lunch I got the drawing for the flounder done.

After lunch I wrapped up warm and headed out to sketch. I spent the first hour and half sat outside around the back of the gorilla island. The gorillas weren't about much,  I only got a few sketchy lines of them, so I used the birds that came into view as my subjects.... moorhens, a mallard, two Chiloe wigeon, a couple of jackdaws, a collared dove and a gull (sketched using my binoculars). None of them were particularly good I was very rusty. But it was good to get some practice in, however awful the results were. 

I got very cold so I headed to a warm spot... the Reptile House. By now the visitor numbers had quietened down so I could sit in my foldaway chair in front of the West African dwarf crocodile enclosure and not be in anyone's way for viewing. The male crocodile was laid out on dry land in a good position for me to sit fairly close (behind the glass) and I stayed there for the next hour drawing his portrait.


At the end of the day just after closing the house at 4.30pm, Tim the Curator of Reptiles came round to the crocodile enclosure. He has a small grill he needed to fix over a pipe that fed water from the croc pool to a turtle pool next door. His attempt failed as the female swam across the pool quickly and defended her territory from him with an aggressive presence. I don't blame him for deciding to come back and try another day... she positioned herself right by the pipe and it would have been unwise for anyone to put their hand down to attach a grill over it. That's how we knew I had been drawing the male... he continued to lay calmly, where he had no doubt been all afternoon, his head came up slightly for a few seconds but that was about it in regards to his response to Tim being in their territory. Apparently the females are the more aggressive defenders. This is her, after she followed Tim round to where I was, coming out of the pool to hold her position and point of view regarding his attempt to get in her domain. One female definitely not to mess with!


I left just after as Tim wanted to shut the house up ready to go home. So again I walked the long way back to the studio and found the red pandas wandering around after just being fed. Again... a number of photo's were taken... they looked great and the light was actually quite nice on them despite being very grey still. 


Saturday, 2 March 2013

Squid paint job 2


The following week I continued to build up the body and tentacles. And now I had to do some colour mixing. First colour to match was a pale blue pink for the two long extended tentacles... this took about an hour and a half to get right and involved some mixing, dabbing a little on the original colour then waiting for it to dry, as the colour darkens when it is dry. So I was adding a little blue, dabbing it, waiting for it to dry... then adding more blue or red and dabbing again and waiting for it to dry... this process was repeated well over 8 times to get the colour as close as I could to the original. During the drying times I would look in on the tanks in the room, which is the Ocean Zone of Bug World. Apart from Lola's tank (the European lobster) there was a small tank with bubble tip soft corals.


This tank is very pretty with the delicate pink of the soft coral and if you are patient and look carefully you can see other creatures in there too... there is a handsome red legged hermit crab, some bristleworms, brittlestars, button star, sponges, little brine shrimp type critters, tiny clams with feather dusters on them. I did spend a lot of my 'drying times' peering into this tank.


Once the blue pink tentacles were painted in I then had another major colour matching session for the maroon red, a pink colour for the undersides of the tentacles and a deeper blue for the  reflections on the squid body. Again it took several hours to get these colours as close as I could. I got the maroon red done first and applied that over the new amendments on the tentacles blending into the old paint to soften the  effect of any tiny colour difference. 


Colour matching the blue. I had three tubes of acrylic paint to add to the emulsion to see which would make the blue I wanted. Cerulean blue, Windsor blue and Ultramarine blue. In the end I used a mix of Windsor and Ultramarine adding a large amount to a small quantity of the background blue.

This blue was dry brushed over the top edges of the squid's body and tentacles to give some form and indicate a bit of reflection from the water. I used the pink to paint in the undersides of the tentacles and add some under reflection on the squid's body. Again dry brush strokes blended the new paint to the old.


The finished squid 1


The finished squid 2


The finished squid 3

I stayed after work on one evening to paint the two areas at either end of the squid; one end (the 'doorway' into the next section of Bug World) to add the tail fluke and blue background and the other to continue the background round to the edge of the mural in the 'halfway exit'. Both of these areas would have been difficult to paint without causing inconvenience to the visitors. So it was easier and ultimately quicker and safer for me to paint them when the 'house' was shut in the evening.

On the final thing to do was to add the suckers on the tentacles. For these I used some potatoes cut up into 'stamps' with three sizes of circles and two sizes of half circles. I dipped these into white emulsion and dabbed them onto the tentacles. And that was it... all done. It has taken about three weeks in all to get prepared for and actually paint, but it was fun to do and the Ocean Zone inhabitants kept me interested during the times I was waiting for paint to dry.     


This is 'Satan', a velvet swimming crab and the top predator in the Rock Pool Tank. He/she is a beautifully marked and coloured crab, which does not show up in this photo. He/she shares the tank with other crabs, a goby fish called 'Obi Wan Gobi', anemones, hermit crabs and various other invertebrates. Again another good tank to watch patiently.

Squid paint job

Well, what with one thing and another time to post over these last two weeks has been a bit rare and consequently I'm now on a catch up series of posts.

Over the last two weeks I have been painting the squid, amending the body and tentacle alignment after the building work. In my last few posts I was preparing for the squid job... now I had just to slap the paint on!


My paints, mixing pots, ref photos and other paraphernalia

I am using Dulux Weathershield Diamond emulsion with a satin finish. I have  a blue which I have matched to the original background colour (it has been painted over several times with paler, less intense blues) This blue is more intense and makes the deep red colour 'sing out' giving the squid more dramatic impact. And I have a deep maroon type red for the squid body.


The first thing I did was to start painting in the blue background, making the corrections to the tentacles and body alignment as I went. I concentrated first on getting the wall with the head and tentacles as far as the tank and screen to the right. As it was quite warm in Bug World the paint dried fairly quickly which meant that once Ihad done the blue I could go back and where it was dry paint in the red of the tentacles. The colour I had chosen for the squid was a close match, but was a little too red and in some places it did not cover the underlying paint. So I planned to add some blue to it to darken and dull the hue... but this would come a little later. You can see in the photo the colour difference from where I have freshly painted the body and the head is the old colour.

I was aware that I had just a day or two before my 'week' was up and I wanted to get it looking basically joined up and presentable for the Thursday through to the Monday as it was school half term break and going to be busy; so it would be nice if it looked half decent for the visitors.


Across the room in a large cold water tank is Lola. A recent change in her lighting (reversing day and night) meant her tank was dark, lit with an eerie blue light, but she was more active during our day as she thought it was night. Lola is an impressive beastie and several times as I waited for paint to dry I went across to look at her.